02·EV-CHA
EV Charging — Tesla Wall Connector
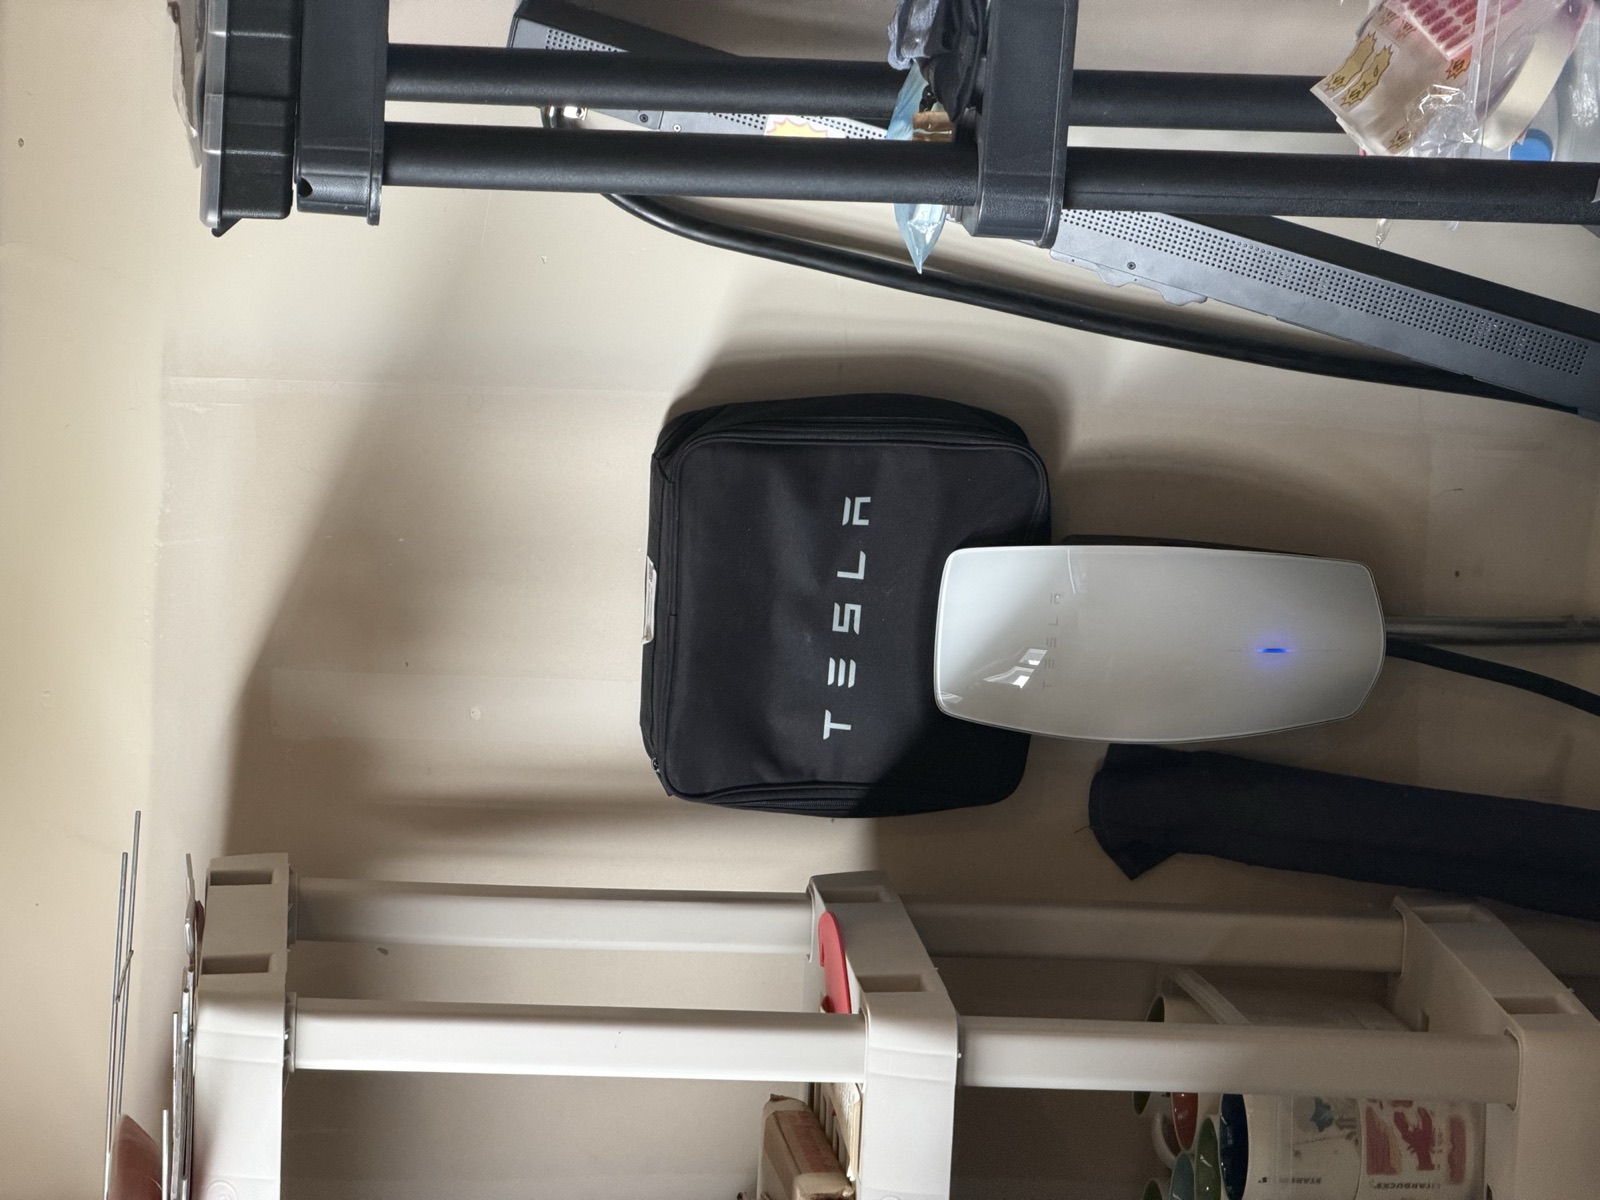
A hardwired Gen 3 Tesla Wall Connector in the garage: full-speed home charging, on a house that makes its own electricity.
At a glance
A Tesla Wall Connector (Gen 3) — a hardwired 240 V Level 2 home charger with a 24-foot tethered cable and built-in WiFi. It is wired into the house and is included with it, no exception.
- Where
- At the front (west) end of the garage, on the north wall, right by the overhead door — between two shelving units, the left-hand one butted against the overhead-door wall. It is mounted at roughly chest height with the cable coiled on a hook. The charge cable runs straight out under the overhead door to a car parked on that side of the driveway.
- Must know
- For a Tesla it is plug-in-and-walk-away — no app, no account, no card. Non-Tesla EVs can charge on it too (Tesla’s default access setting allows all vehicles) — but a J1772 car needs an adapter, because the plug on the cable is the Tesla/NACS shape. Read “Charging a car that isn’t a Tesla” before buying one.
- Status
- Installed and operating. Breaker number, programmed amperage and serial number are still to gather.
2Everyday use
Home charging is the part of EV ownership that turns out to be boring, which is the highest compliment available. You plug in when you get home; the car is full when you leave. You will use a public charger on road trips and almost never otherwise.
Where it is, and where the cable goes
If you drive a Tesla
- Pull into the garage. Take the connector off its holster.
- Push it into the car’s charge port. The port opens on contact and the latch engages.
- The charge-port ring lights up and the car starts charging. That is the whole procedure.
- When you leave, press the button on the connector handle (or release from the car’s screen or the Tesla app) and hang it back up.
You do not need an account, a subscription, or the app for any of this. The Wall Connector supplies power; the car decides how much to take and when.
Set the schedule in the car, not the charger
Almost everything people want from “smart charging” — start at midnight, stop at 80%, precondition before a trip — is set in the car, on its screen or in its app, not on the Wall Connector. A daily charge limit around 80–90% for routine use, and 100% only before a long drive, is standard guidance for lithium-ion packs. You set it once.
How fast it charges
Tesla publishes up to 11.5 kW / 48 A for the Wall Connector, and — for Tesla vehicles specifically — up to 44 miles of range per hour. Two honest caveats before you plan around that number:
- The 44 mph figure is Tesla’s for Model 3 and Model Y at the full 48 A. Tesla publishes 41 mph for Model S and 35 mph for Model X, and rear-wheel-drive Model 3/Y accept only 32 A, giving about 30 mph. For any non-Tesla, Tesla explicitly refers you to that manufacturer’s own figures.
- You only get 48 A if the circuit supports it — a 60 A breaker. This charger is programmed to whatever breaker was actually installed here, and that is not yet documented. See Specs and Deep dive.
Even at half that rate, it is more than enough
Charging on your own solar
The genuinely nice thing about this particular garage
But be deliberate during a power outage
Charging a car that isn’t a Tesla
This question used to have a discouraging answer. It no longer does, and it is worth being precise about what changed.
- The charger will happily charge a non-Tesla. Tesla’s Access Control setting has four options, and the default — “All Vehicles” — allows charging on all electric vehicles with a matching charge port. Tesla’s own documentation states the Wall Connector is compatible with most electric vehicles, not just its own.
- “Matching charge port” is the whole catch. The plug on the end of this cable is the Tesla connector — now standardised as SAE J3400 / NACS. If your EV has a NACS inlet, it plugs straight in. If your EV has a J1772 inlet, you need a NACS-to-J1772 adapter.
- Tesla does not sell that adapter. Every adapter Tesla sells is vehicle-side — for putting a Tesla onto someone else’s station. For a J1772 car at home, Tesla’s answer is to buy a different unit: the Universal Wall Connector, which has a J1772 adapter permanently docked in its side. Third-party NACS-to-J1772 adapters exist and are sold as Wall Connector-compatible, but Tesla does not endorse them.
- One more limitation, if it matters to you: Tesla states that Access Control — restricting charging to specific vehicles — is not supported for non-Tesla vehicles. To let a non-Tesla charge, the setting has to be the permissive “All Vehicles”.
If you buy a third-party adapter, buy carefully
Which unit is on this wall therefore decides the answer. Tesla sells three: the Wall Connector (NACS handle only), the Universal Wall Connector (NACS handle plus a docked J1772 adapter), and a native J1772 Wall Connector. The Universal did not come to market until 2024, so a unit installed before then is the standard model — but the certain answer is to look at the side of the unit for a docked second handle.
There is a second charger on the wall, too
3App
The Wall Connector has built-in WiFi. It uses it for firmware updates from Tesla and for showing charging sessions and settings in the Tesla app. The charger works perfectly with no WiFi at all — you simply lose updates and remote visibility.
The unit’s own setup pages
The Wall Connector broadcasts its own WiFi access point and serves a setup page over it — no app and no account required, a phone and a browser are enough. That page is where the network it joins and the breaker size it is programmed for both live, so it is the interface to reach for whenever the house WiFi changes, whenever the circuit changes, or when a firmware update has to be applied by hand. It needs a 2.4 GHz, password-protected house network to join; it will not use a 5 GHz-only or open SSID.
Owner's edition
Full details in the owner's edition — serial numbers, configuration and identity details continue in the complete manual, handed to the buyer at closing.
The breaker-size setting is a safety setting, not a speed dial
There is a second, deeper route into the same settings: Tesla’s installer commissioning procedure, which runs through the Tesla One app on a Tesla Partner Portal account and steps through country and breaker size, WiFi, software updates and access controls from a scan of the QR code on the unit. It reaches configuration the browser wizard does not expose, which is worth knowing before assuming a setting cannot be changed — it is a job for a Tesla-certified electrician, not a homeowner.
Access control
Four settings exist: All Vehicles (the default — any EV with a matching plug), Only Tesla, Authorized Teslas Only, and Compatibility Mode. Note that Tesla does not support Access Control for non-Tesla vehicles — if you drive one, the setting has to stay on All Vehicles.
4Maintenance
There is essentially no maintenance. What little there is concerns the cable and the connector — the only parts that move.
- Hang the cable up. Don’t let the connector sit on the garage floor, and don’t drive over the cable. That is 95% of the lifespan story.
- Look at the connector face a couple of times a year. Contacts should be clean and undamaged. Discolouration, browning, or a plug that feels hot after charging is a stop-now signal — see Troubleshooting.
- Keep the unit clear — nothing stacked or leaning against it, and nothing hanging off the cable.
- Firmware updates arrive over WiFi automatically once the unit is connected. That is the main argument for connecting it at all.
- Adding a second EV or a second charger is a load-calculation question for an electrician, not a plug-in-another-one question — especially in a house that also carries solar, two Powerwalls and a steam shower. See Deep dive.
5Troubleshooting
| Symptom | First checks | When to call someone |
|---|---|---|
| Car won’t start charging | Unplug and re-seat the connector — an incomplete latch is the most common cause. Check the car’s screen for a scheduled-charging window or a charge limit already reached. Then read the Wall Connector’s status light. | If the light shows a fault pattern that re-seating doesn’t clear, look the pattern up in Tesla’s Wall Connector troubleshooting page before calling — the indications are specific and will save a visit. |
| The Wall Connector is completely dark | Its breaker has almost certainly tripped. Find the breaker in the main panel, switch it fully off, then back on. | A breaker that trips again, especially under load, is a real fault. Leave it off and call an electrician. |
| Charging much slower than expected | The rate is set by the lowest limit in the chain: the breaker, the Wall Connector’s programmed breaker size, the car’s onboard charger, and the car’s own charge-current setting. Cold batteries also charge slower. The car’s charging screen reports the actual amps — start there. | If the car reports well below the circuit’s rating with no explanation, re-check the programmed breaker size in the setup wizard, then call for service. |
| Connector or cable feels hot; contacts discoloured | Stop charging. Unplug. Do not keep using it. | Electrician, promptly. This is the failure mode that matters, and it is usually a connection problem — at the plug, at an adapter if one is in use, or at the terminations inside the unit. |
| Offline in the Tesla app | A WiFi problem, not a charging problem — the charger keeps working. Confirm the house network is up (Network page), then re-run the WiFi step in the setup wizard. Remember it needs a 2.4 GHz password-protected SSID. | Only if it won’t rejoin a working 2.4 GHz network after re-commissioning. |
| A non-Tesla car won’t charge | Check Access Control is set to “All Vehicles” — the other three settings exclude non-Tesla vehicles. Then check the adapter: right direction (NACS-to-J1772), undamaged, properly seated. | If you are relying on an unlisted third-party adapter, replace it before troubleshooting anything else. |
Find the breaker before you need it
6Specs & identity
| Device | Tesla Wall Connector, Gen 3 — the single horizontal LED status bar is the Gen 3 signature (the Gen 2 unit carries a vertical column of five LED dots instead) |
|---|---|
| Wiring | Hardwired, 240 V (Tesla rates the unit 200–240 V single phase) |
| Connector type | Tesla / NACS (SAE J3400) handle. A J1772 vehicle needs an adapter — see Everyday use |
| Connectivity | Built-in WiFi, 2.4 GHz 802.11b/g/n, password-protected networks only |
| Cable | Tesla specifies a 24 ft cable for this unit. In practice the cable runs out under the overhead door to the car; confirm reach across the interior bays if you intend to charge inside |
| Enclosure | Tesla rates the unit Type 3R / IP54 (indoor or outdoor) |
| Location | Garage, north wall, front (west) end, right by the overhead door — between two shelving units, the left-hand one butted against the overhead-door wall. Mounted at roughly chest height with the cable coiled on a hook |
| Cable route in use | Out under the overhead door to a car parked on that side of the driveway |
| Standard vs Universal model | to confirm at walkthrough — look for a J1772 adapter docked in the side of the unit. The Universal Wall Connector only came to market in 2024, so an earlier installation is the standard model |
| Tesla Mobile Connector (portable charger) | A Tesla-branded Mobile Connector hangs in its bag on the wall beside the Wall Connector. Whether it conveys is to confirm |
| Conveys with the house | Yes — hardwired, and included with no exception |
| Main electrical service | On the outside of the garage’s north wall, about two feet from the man door on the front (west) side of it — the panel this circuit runs from. See Electrical & Energy |
| Circuit breaker number | To gather — the panel’s own labels are not exact, so this comes from the schedule on Electrical & Energy rather than from the door |
| Breaker size | To gather — read the breaker handle. Tesla’s table: 60 A → 48 A / 11.5 kW · 50 A → 40 A / 9.6 kW · 40 A → 32 A / 7.7 kW · 30 A → 24 A / 5.7 kW · 20 A → 16 A / 3.8 kW · 15 A → 12 A / 2.8 kW |
| Programmed breaker size in the unit | To gather — read from the setup wizard at 192.168.92.1 during commissioning, and confirm it matches the physical breaker |
| Serial number | owner's edition |
| On backup power during an outage? | To confirm — whether this circuit sits on the backed-up side of the Tesla gateway |
| Install date | To confirm — needed for warranty and for establishing which model this is |
| Quick Start Guide / QR card | To locate — it carries the WiFi QR code and the setup password. The same code is on the label behind the unit’s wiring cover |
| Wall Connector 12-digit setup password | see credentials sheet |
Why the breaker and amperage are blank rather than guessed
7Documents & links
- Tesla — Wall Connector support
The main owner support page: specifications, charge speeds, compatibility. - Tesla — Installing a Wall Connector (commissioning)
The current commissioning procedure, including the WiFi and breaker-size steps. - Tesla — Wall Connector troubleshooting
Status-light patterns, the browser wizard, and offline firmware updates. The page to read before calling anyone. - Tesla — Wall Connector access control
The four access settings, and Tesla’s statement that access control is not supported for non-Tesla vehicles. - Tesla — Gen 3 Wall Connector installation manual (PDF)
The authoritative document: breaker/output table, wire sizing, commissioning, specifications. Archived locally — exact match (NA 48A single-phase variant); Tesla publishes only one combined manual for this unit. - Tesla — Universal Wall Connector installation manual (PDF)
For comparison — the model with a J1772 adapter docked in the side. - Tesla — charging & adapter product guides
Every Tesla charging manual and adapter guide in one place. - Tesla Energy Library — Wall Connector
Tesla’s document library for the product. - SAE J3400 — North American Charging System (NACS)
The standardisation of the Tesla connector (Recommended Practice, revised September 2024). - SAE J3400/2 — connectors and inlets
The dimensional specification for the connector (April 2025). - US DOE / Joint Office — charging connectors explained
A plain-language, neutral explanation of NACS vs CCS1/J1772 — useful if you are buying a non-Tesla EV.
Section 8Technical reference ExpandCollapse
The engineering layer — for a buyer's technician, or a curious owner.
For anyone who wants to know what this circuit can actually do, and what the options are for a second car.
What sets the charge rate
A Level 2 home charger is, electrically, a switched 240 V connection with a safety supervisor. It converts nothing — the car’s onboard charger does that. So the delivered rate is the minimum of four independent limits:
- The branch circuit — breaker and conductor size, fixed at installation. Continuous loads are limited to 80% of the breaker rating by code, which is why a 60 A breaker yields 48 A of charging. Tesla’s published table runs from a 15 A breaker (12 A / 2.8 kW) to a 60 A breaker (48 A / 11.5 kW).
- The programmed breaker size in the unit — set during commissioning, and required to match the circuit above. On Gen 3 this is software; the Gen 2 Wall Connector’s internal rotary switch is gone.
- The vehicle’s onboard charger — many EVs cap well below what a large home circuit could deliver. This is often the real bottleneck. Even within Tesla’s own range, rear-wheel-drive Model 3 and Model Y accept only 32 A.
- The vehicle’s own charge-current setting — user-adjustable in most cars, and easy to leave turned down and forget.
Because the circuit here is not yet documented, no charge-rate figure is asserted on this page. Once the breaker is read, the answer is one line off Tesla’s table — a five-minute walkthrough task with a permanently useful result. For reference when sizing or verifying: Tesla specifies 4 AWG conductors for full 48 A output with a 60 °C-rated breaker, or 6 AWG with a 75 °C-rated breaker (90 °C THWN-2 copper), and states that external disconnect switches are “neither required nor recommended”.
Adding a second EV
Three realistic options, in increasing order of cost:
- Share the one connector. Unglamorous and completely fine for most two-car households — an overnight charge replaces far more range than a typical day consumes.
- Add a second Wall Connector and share the circuit. Tesla Wall Connectors support power sharing (Tesla calls it group power management): units coordinate over WiFi in a group of one leader and up to five followers, so their combined draw never exceeds the circuit rating. Each car charges more slowly when both are plugged in and at full rate when it is alone. This avoids a new circuit entirely, and it is configured in the same setup wizard.
- Run a second dedicated circuit. The right answer if you want two cars at full speed, or a native J1772 station for a non-Tesla. This is a load-calculation conversation — in a house with solar, two Powerwalls and substantial 240 V loads, worth doing properly rather than by eye. The relevant panel details are on the Electrical & Energy page.
The Wall Connector also supports dynamic power management, which throttles charging in real time against a whole-house energy meter so the service main is never overloaded. It requires a compatible meter and current transformers at the panel. Worth knowing this exists before anyone tells you the only path to two chargers is a service upgrade.
The connector standard, and where it is going
Tesla’s connector was proprietary for a decade. It has since been published by SAE as J3400 — “North American Charging System (NACS) for Electric Vehicles”, a Recommended Practice first issued in December 2023 and revised in September 2024, with a companion J3400/2 covering connectors and inlets (April 2025).
The practical consequence for this garage is that the plug on this wall is increasingly the one new cars are built for — this equipment is aging into the standard rather than out of it. Factory NACS inlets are shipping across much of the industry: Hyundai’s IONIQ 5 and IONIQ 9, Kia’s EV6 and EV9, Toyota’s bZ and the Lexus RZ, the Subaru Solterra, the Mercedes CLA with EQ Technology, and Cadillac’s Optiq, among others. Several major brands — Ford and the Volkswagen group among them — are shipping adapters for Supercharger access while their vehicles still carry CCS1 inlets, so “supports NACS” and “has a NACS port” are not the same claim.
Getting the adapter direction right
Before assuming compatibility with any particular car, establish three things: which Wall Connector model this is, what firmware it is on, and what the circuit rating is. Those three answers determine everything else on this page.
What to gather to finish this page
Owner's edition
Full details in the owner's edition — serial numbers, configuration and identity details continue in the complete manual, handed to the buyer at closing.